Measure from the finished surface you stand on to the shower arm’s wall outlet, then account for the arm and head together. A familiar starting point is 78 inches: Moen specifies that arm height in one tub/shower installation guide. It is a product-specific dimension, not a universal height for the spray face. Your selected assembly, tallest user, ceiling and control reach determine whether it works.
Check the height above your head
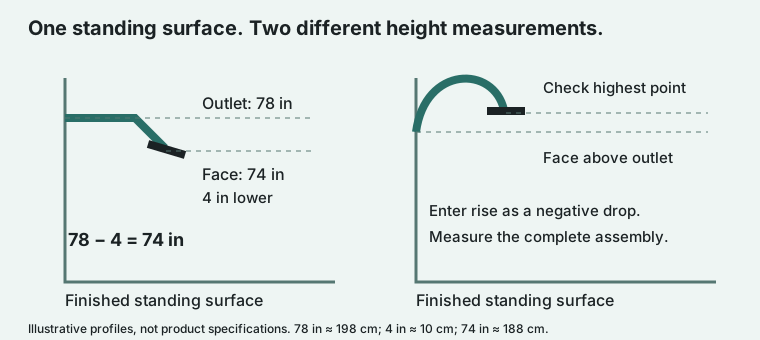
Enter the wall-outlet height and the vertical distance down to your chosen spray-face reference point. Use a negative drop if that point sits above the outlet. The result is simple height arithmetic, not a comfort rating or installation approval. Measure every height from the same standing surface.
On small screens, scroll diagrams sideways to read all the labels.
With a 78-inch outlet, a 4-inch drop and a 70-inch person, the reference point is at 74 inches, or 4 inches above the person. Change the drop to 6 inches and that difference becomes 2 inches. Those are invented comparison inputs; they do not describe every conventional shower head.
Why “standard shower head height” can be misleading
Someone measuring the pipe at the wall and someone measuring the bottom of a rain head can report different heights for the same shower. Before comparing numbers, label the points: wall outlet, shower-head connection and spray face. On an angled head, also identify whether the drawing measures its center or lowest edge.
| Reference point | Moen INS10177A example | What to verify |
|---|---|---|
| Shower arm at wall | 78 in / 198 cm | Measured above the shower floor or tub basin floor. |
| Shower-only valve center | 45–48 in / 114–122 cm | Reach and the exact valve installation sheet. |
| Tub/shower valve center | 32 in / 81 cm | Reference is the tub basin floor, not its rim. |
| Spray-face height | Depends on the assembly | Arm geometry, head size and adjustment angle. |
These examples apply to the models named in that Moen guide. It also warns that departing from its recommended installation measurements can affect tub/shower performance. Use the current instructions for the valve and trim you actually buy; do not combine attractive numbers from unrelated products.
A measurement to a finished floor is also different from one to the subfloor. Draw a clear baseline on the proposed wall elevation. If the shower base or tub has not been installed, record its finished standing height before setting out the outlet. See the bathtub size guide when choosing the fixture itself.
Measure the assembly before opening the wall
Start with a dry mock-up on paper or a board. Mark the standing surface, the wall outlet and the installed head. Ask the installer to confirm where the product drawing takes each measurement. A long arm can extend farther into the shower without raising the spray face; length alone does not tell you height.
Next, have each regular user stand where they would shower. Check the tall user’s head clearance and the shorter user’s ability to adjust the head or retrieve a hand shower. Allow room for ordinary movement, rather than aiming for a head that only just clears someone standing still. The calculator deliberately gives no universal “comfortable” threshold.
Finally, compare the assembly’s highest point with the ceiling, including any swivel or adjustment movement. A spray face can sit below the ceiling while the curved arm above it cannot fit. For a ceiling-mounted rain head, check the manufacturer’s mounting and support details separately; a wall-outlet calculation does not establish its installation height.
The ceiling rule is a separate check
NKBA’s published planning guide summarizes an 80-inch floor-to-ceiling minimum over a 30 × 30-inch area at a shower head, referring to the 2015 IRC. That is a ceiling provision, not an instruction to install every head at 80 inches. Confirm the locally adopted code and any amendments with the installer or building department.
This matters under a sloping ceiling: measuring one high point does not describe the whole showering area. Record where the required clear area falls, then check the actual head, arm and user within it. The shower size guide covers the floor-space side of that decision.
Place the controls where you can use them
Head height and valve height solve different problems. The head directs water; the valve must be reachable when starting and adjusting the shower. Mock up both together with the shower entrance, glass and any seat. Reaching around a fixed screen or leaning under cold water can make a technically workable wall arrangement awkward every day.
For a shared shower, an adjustable hand shower can give different users more choice. Check the holder’s adjustment range, hose reach and a position where the shorter user can retrieve it. A rail is not a grab bar unless it is specifically designed, rated and installed for that purpose.
Where ADA requirements apply, use the appropriate shower configuration and control provisions, not the ordinary residential examples above. The U.S. Access Board specifies a hand-held/fixed-use spray unit with a hose at least 59 inches long under section 608.6, subject to its stated exception; controls also have location and reach requirements. Our ADA mounting-height guide explains the reference points.
Watch a high shower gain a reachable hand spray
In Shower Upgrades for Aging in Place, Richard Trethewey identifies the homeowner’s high fixed shower head at about 2:12. The finished hand-shower arrangement appears around 8:18. Watch how the user gains another way to direct water without treating the existing outlet as the only usable height.
The useful lesson is to test the person’s reach, including the holder and selector. The clip does not establish a standard head height. Product connections, supporting structure and any wall penetrations still need the instructions for the chosen equipment.
Final Takeaway
Choose shower head height by measuring the complete assembly from the finished standing floor. Check the spray-face position, the highest part of the arm, the ceiling and each user’s reach. A labeled wall sketch and a physical mock-up will tell you more than copying a single “standard” height.
Main Sources
- Moen INS10177A, installation schematics on page 2 — dimensions for the models listed in that guide.
- NKBA Bathroom Planning Guidelines, Guideline 3 — ceiling provision summarized from an older model-code edition.
- U.S. Access Board, ADA Standards section 608 — shower controls and spray units where applicable.
- This Old House, Shower Upgrades for Aging in Place — the embedded hand-shower example.
Calculator examples and diagrams are original BathDraft illustrations. Metric figures are rounded conversions, not separate installation tolerances.