A tub-to-shower conversion often starts with a nominal 60-inch alcove base, but matching the tub’s advertised size is only the first step. Check the framed opening, the new base’s projection into the room, the finished door opening and the drain. A same-size base is not automatically a drop-in replacement.
How to read the result: a green base row means its listed rough-opening width and estimated front clearance pass these two checks. A question mark means a measurement or an actual-product check is still missing. A red row identifies a mismatch under the values entered. A 34-inch base can therefore show green while a 36-inch model remains unconfirmed; that is not evidence that the larger product definitely cannot work.
The door rows screen width separately. They do not select a door-and-base package for you. Match the exact model numbers, ledge requirements and wall construction before treating any two products as compatible.
Start with four measurements, not the “60-inch” label
Before shopping, draw the existing tub, nearby toilet or vanity, room door and proposed shower entrance. Mark which dimensions are measured and which are still estimates. That distinction matters when the old surround hides the framing.
- Base opening. Measure between the end-wall studs when accessible. The selected base’s rough-in drawing determines the required opening; a finished tile-to-tile width does not.
- Existing tub projection. Use the back-wall framing as the reference, then measure to the front edge. Comparing this with a base depth measured from framing avoids mixing two different starting points.
- Floor gap in front. Record the nearest fixed obstruction at the planned entry. Include a projecting vanity, toilet bowl or radiator, rather than measuring to the wall behind it.
- New finished opening. This is the door measurement after the chosen wall system is installed. The old tub opening can help with planning, but it cannot confirm the new door order.
On smaller screens, scroll the diagram sideways to read the labels.
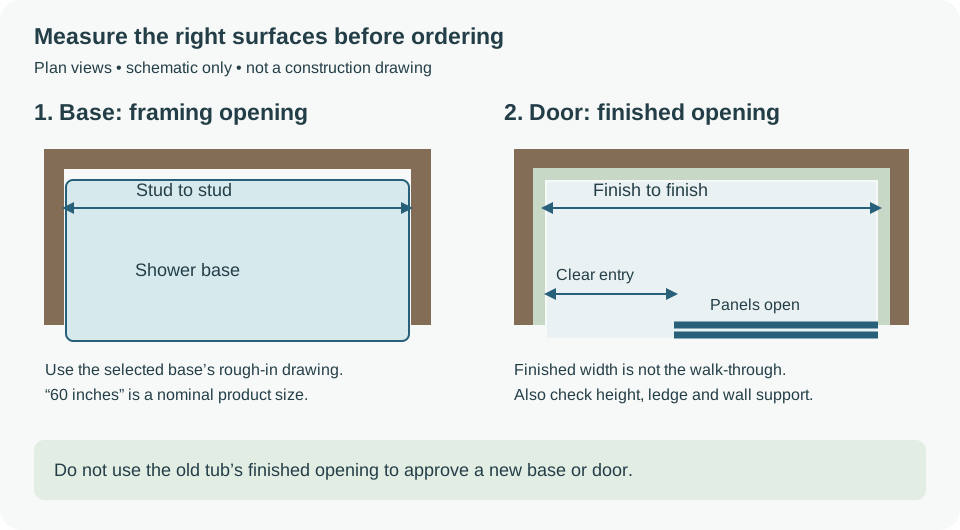
Check squareness and plumb as well as width. An opening can be wide enough at the bottom and too narrow above it. Leave unknown fields blank in the checker; a question mark is more useful than a confident result based on a guessed measurement.
What changes when the base gets deeper?
The checker compares nominal depths of 30, 32, 34 and 36 inches. Its arithmetic assumes the back-wall reference and opposite obstacle stay in the same places. It does not account for a newly built wall, extra framing allowance or an actual base that differs from its nominal size.
Estimated floor remaining = existing floor gap − (new base depth − existing tub depth).
For a 30-inch existing footprint with 30 inches of clear floor, a nominal 34-inch base uses four more inches and leaves 26. A 36-inch base leaves 24. That last result reaches this checker’s screening target without leaving extra margin for a different installed projection.
On smaller screens, scroll the diagram sideways to read the labels.
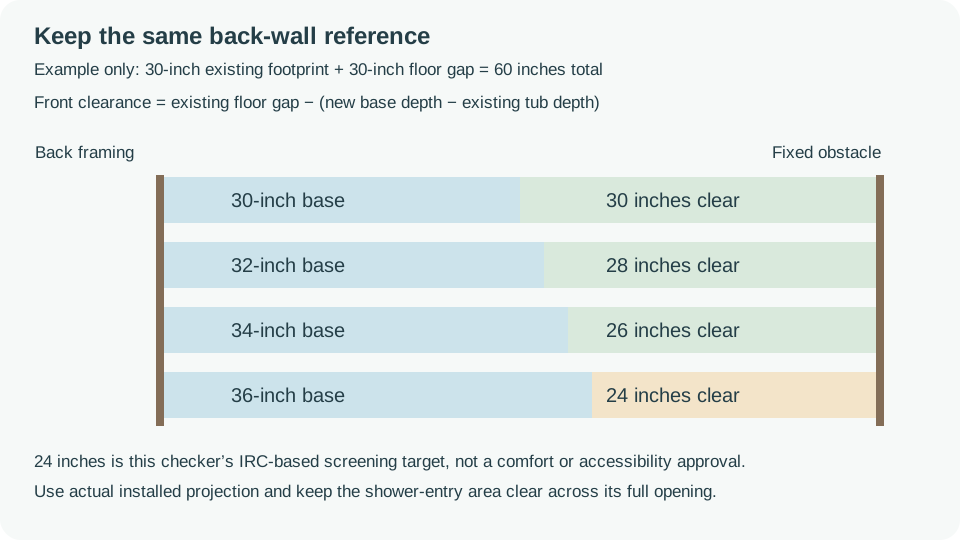
The ICC’s 2024 IRC Study Companion shows 24 inches clear in front of a shower opening. This is the model-code reference used here; your locally adopted rules and project requirements control. The check is not an accessibility assessment, and 24 inches does not establish comfortable turning or assisted use.
| Nominal base | Examples in the checker | Opening check |
|---|---|---|
| 60 × 30 in | Rely K-8643; Ensemble 72171810 | Rely: actual product. Ensemble: 60⅛–60¼ in stud opening. |
| 60 × 32 in | Rely K-8459; Ensemble 72181920 | Rely: actual product. Ensemble: 60⅛–60¼ in stud opening. |
| 60 × 34 in | Rely K-8649; Ensemble 72131100 | Rely: actual product. Ensemble: 60⅛–60¼ in stud opening. |
| 60 × 36 in | Archer K-9479; Swan SS-3660 | Actual product and installation instructions required. |
These are examples, not interchangeable systems. Swan specifies an opening based on actual pan width plus ⅜ inch and actual depth plus at least 3/16 inch. Kohler directs installers to measure the actual Archer and Rely products. Their checker rows therefore stay unconfirmed for rough-opening fit.
Choose the entry before choosing the glass
A sliding door can suit a room where an outward swing would conflict with a fixture. However, the opening between the walls is not the passage you walk through: the overlapping panels occupy part of it.
For example, Kohler’s Levity K-706009-L fits finished widths of 56⅝–59⅝ inches, while its published walk-through range is 24 9/16–27 9/16 inches. The sheet also specifies a minimum flat shower ledge and installation height. A successful width check cannot verify those conditions.
Mark the proposed entry on the floor and consider how the person using it will approach the controls, carry bathing items and step out to dry. Check handles, towel bars and nearby doors. For a hinged enclosure, verify the full opening path with the chosen product and applicable rules.
Also separate outside base dimensions from finished standing space. Walls, rims, panels and seats can reduce the interior. Calling a product “walk-in” or “low threshold” does not establish wheelchair access or remove the need for a usable entry.
A conversion example: the drain may still move
In the demonstration below, Keifer Kelson of KLK Builds works through an out-of-square opening, a dry fit and a drain relocation. Watch from about 1:59 for the drain issue: reusing the old tub location does not guarantee that a new pan connects in the same place.
The useful lesson is the sequence: confirm the opening and drain arrangement before final installation. The featured kit’s trimming methods, adhesives and plumbing choices should not be transferred to a different base. A manufacturer allowing one product to be trimmed says nothing about whether another can be cut.
Ask the installer to resolve these items before the order becomes final:
- Drain and trap. Confirm position, access, pipe requirements and whether the floor structure limits relocation.
- Base support. Check subfloor condition, level and the specified support method; a flat-looking finished floor is not proof of adequate support.
- Walls and backing. Coordinate the wall system, waterproofing connections and support for the selected door or grab bars while the wall is open.
- Controls and threshold. Agree on reach, entry and water containment. A conversion does not automatically require one universal valve height.
- Permits and inspections. Confirm local requirements for the actual plumbing and construction scope before work starts.
Decide what the conversion needs to achieve
If this is the home’s only tub, consider how the household actually bathes. Children, a person who prefers soaking and someone who needs an easier entry may have different priorities. Avoid assuming that removing or keeping a tub guarantees a resale outcome.
When comparing quotes, list the same scope: demolition, disposal, drain work, base, walls, waterproofing, controls, enclosure, making good and inspections where required. Ask which concealed-condition repairs are excluded. The bathroom remodel cost calculator can help organize the wider budget; this checker is for the conversion’s dimensional decisions.
Final Takeaway
Shortlist a base only after separating the framing, footprint, finished opening and entry measurements. Use the checker to spot an obvious mismatch, then verify the actual base, wall system, drain and door together. Keeping the old tub location can simplify a project, but it does not make the installation automatic.
Main Sources
- Shower bases for a 60 in alcove: Kohler Rely 60 × 30 (K-8643), 60 × 32 (K-8459) and 60 × 34 (K-8649); Kohler Archer 60 × 36 (K-9479); Sterling Ensemble 72171810 (a 60⅛ to 60¼ in stud opening), 72181920 and 72131100; Swanstone SS-3660 (spec drawing and installation guide)
- Doors for 60 in openings: Kohler Levity K-706009-L, Sterling Finesse 5475-59 and Meritor 581075-59 spec sheets
- International Code Council, 2024 IRC Study Companion, page 66 — front clearance used for this preliminary screen.
- CASTICO’s introduction to the KLK Builds installation — original demonstration and paid-partnership disclosure.
Manufacturer instructions control their own products. The diagrams and depth calculations are BathDraft illustrations, not measured site surveys or approval documents.